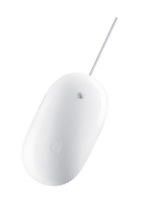
How to clean your Mighty Mouse
I
f your Mighty Mouse is covered in
fingerprints or its surface has become soiled, it can
be gently wiped with a clean lint-free cloth. If
necessary, moisten the cloth using only water, making
sure not to over saturate it. Be aware that the mouse
contains electronic components that may be damaged if
water drips from the cloth into the mouse via the
seam around the scroll ball or around its underside.
The same procedure can be used to clean the scroll
ball on your Mighty Mouse if it has become discolored
or dirty. Use a clean lint-free cloth lightly
moistened with water. Wipe the ball and the
surrounding area, making sure to rotate the ball
itself to ensure complete coverage. If the scrolling
feels rough or if the scroll ball isn't scrolling up,
down, or side-to-side, hold the mouse upside-down and
roll the ball vigorously while cleaning it to help
dislodge any particles that may have collected on the
internal hardware.
For a video demonstration, click here.
My Mac Cheat Sheet
W
hether your Mac asks you for
certain information or you're seeking help from Apple
or an Apple Authorized Service Provider (AASP), there
may come a time when you need to have access to your
serial number, hardware configuration, passwords,
email server or internet access information. That's
when you discover that you've either forgotten or
misplaced this important information.
Don't worry, just refer to your Mac Cheat Sheet. To
make your Mac life a little easier, Apple has created
this handy cheat sheet to help you organize
often-asked and useful information about your Mac.
Select the PDF document link below, print it out,
fill in the fields with your information, and store
the Mac Cheat Sheet in a safe and secure place.
Download My
Mac Cheat Sheet PDF
Iced Chip Tips
Cold weather can wreak havoc on temperature-sensitive drives inside computer games, portable music devices and digital cameras. Condensation and expanding components can lead to drive failure and data loss. If you leave any such items in the car overnight, be sure to let it sit at room temperature for 8-10 hours before powering up!
Top 30 Mistakes Made By New Mac Users When Switching From Windows
-
Closing an application window, thinking it has quit.
-
Downloading an app and running it from the disk image.
-
Creating endless untitled folders.
-
Using Safari’s Google search to get to a website.
-
Confusing the concept of wallpaper with screensaver.
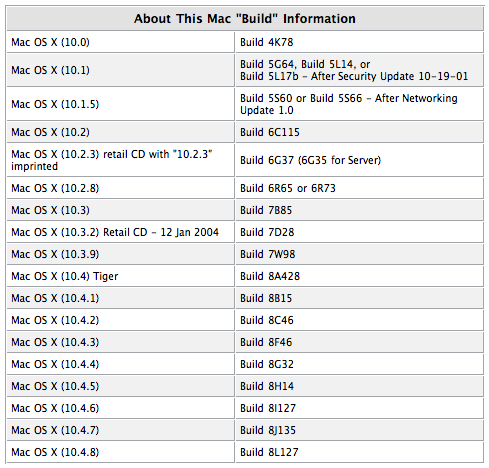
Mac OS X: About This Mac "build" information
Learn
about build versions, such as "Build 8L127," which
appear in the About This Mac window and System
Profiler.
The
build version you see depends on the version of Mac
OS X that you have installed. The version changes
when you use the Software Update feature to update
core system software.
Burning Multiple Times to the Same CD
G
enerally, when you burn files to a
CD once, you’re done — you can’t burn to that CD
again. Unless you use this little trick: First create
a new folder and give it a descriptive name
(something like “burn baby burn!” Kidding). Now put
the files you want to burn into that folder, then go
to the Applications folder and open the Utilities
folder. Double-click on Disk Utility. When it comes
up, go under the File menu, under New, and choose
Disk Image from Folder, and then when the Open dialog
appears, find that folder with the stuff you want to
burn and click the image button. A Save dialog
appears in which you can leave the name as is or
choose a new name (leave the other controls alone),
and then click Save. In a few moments, a disk image
of your folder’s contents will appear in the list on
the left side of the Disk Utility dialog. Click on
that icon, and then click the burn button at the top
left of the Disk Utility dialog.
When you click the Burn button, a dialog will appear
asking to insert a disc. Do so, and then click once
the blue downward-facing triangle on the right side
of this dialog to show more options. Click on the
checkbox for Leave disc appendable, then click the
Burn button. Your data will now be written to that
CD. To add more files later, just insert that same CD
and then you’ll use this same process all over again,
but when you get to that final burn dialog, the
button won’t say “Burn” this time, instead it will
say “Append” because you’re adding these files to the
same disc. By the way, don’t forget to remove the
files you already burned to this disc from your “burn
baby burn!” folder (and the DMG file it creates)
before you make your next disc image.
Mac OS X: About This Mac window provides computer serial number
You
can use the About This Mac window to find your
computer's serial number when started up from Mac OS
X 10.1 or later.
Follow these
steps:
Choose About This Mac from the Apple Menu.
Double-click the version text,
for example "Version 10.1".
Your computer's serial number now
appears where the version text had been.
Note: Some earlier Mac OS X-compatible computers do
not have their serial numbers stored in a way that
allows this feature to work.
Lack of this feature on your computer does not indicate any software or hardware failure.
How to change the volume on your Mac without that little sound

D
epending on the type of keyboard you
have, you may be able to use the volume keys on your
keyboard (the ones with a speaker icon) to change the
volume of your computer’s speakers. When you press
one of these keys, normally you hear the alert sound
play to let you hear the new volume. If you want, you
can prevent the alert sound from playing when you
change the volume.
To turn off the volume keys’ sound feedback, choose
Apple menu > System Preferences and click Sound.
Click Sound Effects and deselect the “Play feedback
when volume keys are pressed” checkbox.
To temporarily turn off the volume keys’ sound
feedback, hold down the Shift key when you press a
volume key. Not all keyboards have volume keys. If
you don’t see keys with speaker icons, you cannot
change your computer’s volume using your
keyboard.
Where Did That Download Come From?
If
you download a file from the web, you can usually
find out exactly where that downloaded file came from
(including the exact web address) by pressing
Command-I when you have the file selected.
Once the info dialog appears, click on the
right-facing arrow beside More Info to expand that
panel and it will display a Where from header, and to
the right of that it will show the exact web address
from which the file was originally
downloaded.